
How to Tape Hands for Volleyball: Quick Steps and Core Techniques

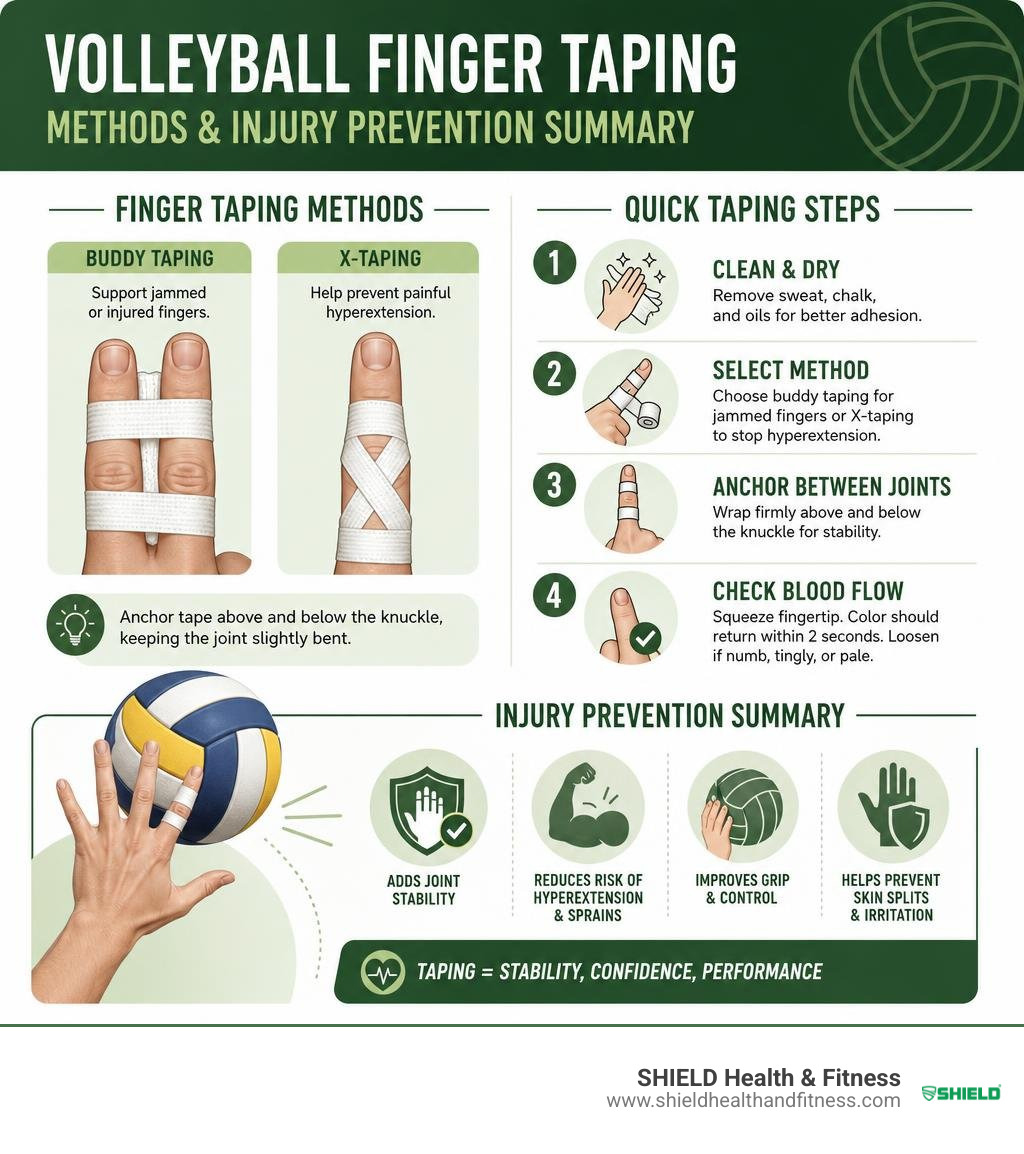
To tape your hands and fingers for volleyball quickly and securely, follow this standard court-ready routine:
- Clean and dry your skin: Wash off sweat, chalk, and oils so the tape adheres firmly during play.
- Select your method: Use buddy taping (binding an injured digit to an adjacent healthy finger with gauze between them) for jammed joints, or X-taping across the knuckle to stop painful hyperextension.
- Anchor between joints: Wrap 0.5-inch rigid athletic tape firmly around the finger bones above and below the knuckle, keeping the joint slightly bent.
- Check blood flow: Squeeze your fingertip. Normal pink color must return within two seconds. If your finger throbs, tingles, or turns pale, loosen the wrap immediately.
Your hands absorb tremendous force on every block, set, and attack. In fact, finger trauma accounts for 13.4% of all acute volleyball injuries and makes up 43% of all upper-body injuries in the sport. Taping provides mechanical stability to vulnerable ligaments, boosts your grip, and prevents skin splits caused by dry leather balls.
I'm Josh Key from SHIELD Health & Fitness, where I've spent years testing performance gear with top athletes to teach players exactly how to tape hands for volleyball. In this guide, I'll break down the exact step-by-step techniques to keep your fingers strong, secure, and pain-free across every set.
Why Volleyball Players Tape Their Hands and Fingers
When you play front row or set a heavy ball, your terminal phalanges bear the brunt of extreme mechanical loads. Research into athletic hand trauma shows that sprains and strains account for 42.6% of finger injuries in volleyball, while bone fractures make up 19.5%. Without proper reinforcement, a high-velocity spike striking an outstretched hand can easily hyperextend joints or tear delicate collateral ligaments. Applying athletic tape for hands offers physical reinforcement that helps keep joints aligned during severe impacts.
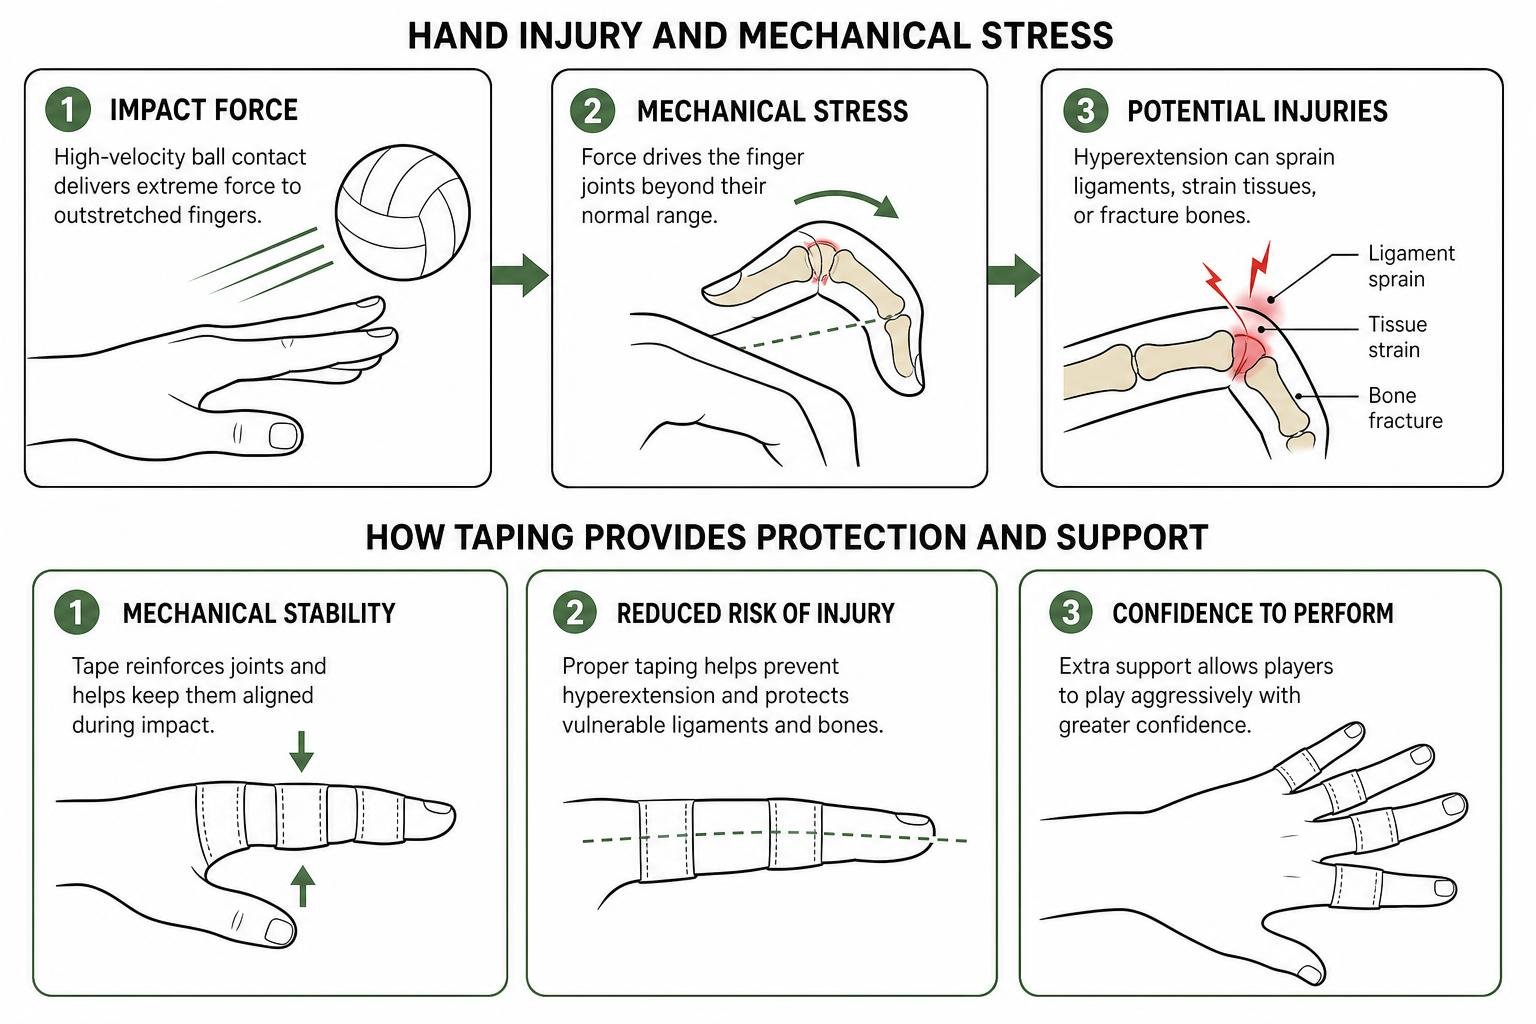
Beyond structural reinforcement, finger taping delivers three distinct functional benefits:
- Skin and Nail Defense: Repetitive contact against hard, dry leather splits calluses and tears nail beds. Capping fingernails and wrapping pads shields dry skin against friction splits.
- Proprioceptive Awareness: Clinical studies demonstrate that taping improves joint position sense (proprioception). The tactile tension of tape against the skin stimulates neural pathways, giving your brain real-time feedback on hand posture during high-speed net play.
- Psychological Confidence: Stepping up to block a powerful hitter requires complete commitment. Knowing your vulnerable joints have extra support allows you to attack the ball aggressively without hesitating.
For a deeper medical perspective on ligament trauma and recovery, review these clinical insights on hand and wrist trauma in volleyball from board-certified orthopedic specialists.
Essential Equipment: Preparing How to Tape Hands for Volleyball
Having the right gear ready in your court bag makes all the difference when game time arrives. We recommend keeping two specialized varieties of tape on hand:
- Rigid Zinc Oxide Tape: Non-stretch tape is the gold standard for structural stabilization, hyperextension prevention, and buddy taping. Our Shield Precision Tape 24pk 1/2 inch x 10 Yards provides clean edge tears and narrow dimensions, fitting neatly between finger joints without restricting mobility.
- Elastic Adhesive Bandages: Flexible tape allows natural articulation while compressing soft tissue. Utilizing Shield Reflex Stretch Athletic Tape gives setters and defensive specialists dynamic joint protection without sacrificing the tactile touch needed for precision sets.
Before applying tape, wash your hands thoroughly with soap and water to eliminate sweat, sunscreen, and skin oils. If you are using a new brand of athletic tape for the first time, perform a quick 30-minute skin patch test on your forearm prior to warmups to confirm you do not experience adhesive sensitivity or contact dermatitis.
Step-by-Step Guide: How to Tape Hands for Volleyball

Applying athletic tape requires clean execution. The goal is simple: support the ligaments while maintaining normal joint articulation and blood flow.
| Tape Type | Stretch Capacity | Best Application | Primary Advantage |
|---|---|---|---|
| Rigid Zinc Oxide | None (Static) | Buddy Taping, X-Taping, Nail Caps | Maximum joint lockdown and hyperextension defense |
| Elastic Stretch Tape | 30% - 60% Elasticity | Spiral Wraps, Setter Support, Thumb Spica | Preserves touch sensitivity and soft tissue compression |
The Buddy Taping Method for Jammed and Sprained Digits
Buddy taping pairs a compromised finger to an adjacent healthy digit, turning the strong neighbor into a natural anatomical splint. This method is the baseline protocol for stabilizing mild interphalangeal sprains (Degree 0 and Degree 1 trauma).
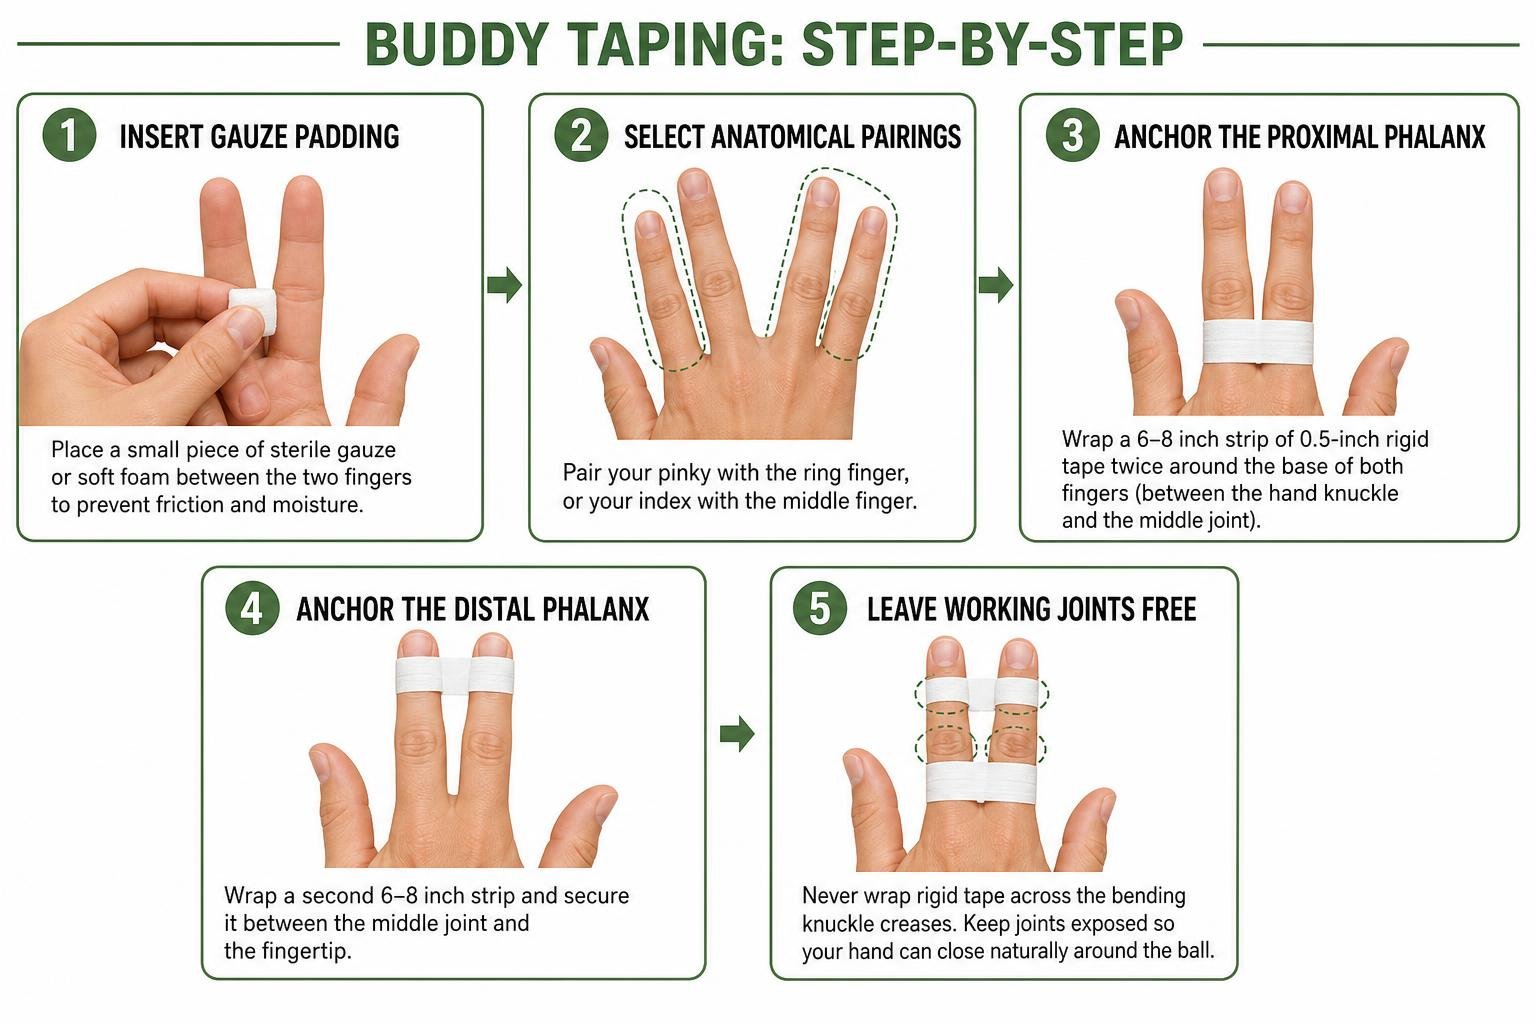
- Insert Gauze Padding: Fold a small piece of sterile gauze or soft foam and place it between the two fingers. This step prevents moisture buildup, skin maceration, and painful friction during long rallies.
- Select Anatomical Pairings: Always follow natural hand anatomy. Pair your pinky finger with the ring finger, or your index finger with the middle finger.
- Anchor the Proximal Phalanx: Take a 6-to-8-inch strip of 0.5-inch rigid tape. Wrap it twice around the base of both fingers (between the hand knuckle and the middle joint).
- Anchor the Distal Phalanx: Take a second 6-to-8-inch strip and wrap it between the middle joint and the fingertip.
- Leave Working Joints Free: Never wrap rigid tape directly across the bending knuckle creases. Keep joints exposed so your hand can close naturally around the ball.
The Crisscross X-Taping Technique for Joint Bending and Hyperextension
When you need to stop a single finger from bending backward during net blocks while retaining complete gripping freedom, the crisscross X-taping technique provides exceptional collateral ligament support.
- Position the Finger: Hold the target finger in a relaxed, semi-flexed posture (slightly bent inward).
- Lay the Lower Anchor: Wrap a strip of 0.5-inch tape around the base of the finger below the middle knuckle.
- Apply the Diagonal Support: Anchor a strip on the lower side, pull it diagonally across the inner knuckle crease, wrap around the back of the upper bone, and cross downward on the opposite side to create an "X" pattern across the joint.
- Lock the Top Anchor: Wrap a finishing strip around the finger above the joint to lock the X-pattern firmly in place.
- Test Joint Tension: Straighten your finger. You should feel the tape tighten firmly before the joint reaches hyperextension.
To explore comprehensive joint wrapping protocols for court athletes, consult our ultimate athletic tape guide volleyball.
Thumb and Fingertip Wrapping for Nail and Skin Protection
Front-row hitters and blockers frequently split their fingernails or suffer painful thumb hyperextension when contacting hard-driven spikes.
- Fingertip & Nail Cap Technique: Cut a 3-inch strip of rigid tape. Anchor it on the fingerprint pad, draw it smoothly over the top of the nail bed, and press it flat down the back of the finger. Anchor this cap by wrapping a 0.5-inch strip horizontally around the circumference of the fingertip, keeping the tape below the active joint crease.
- Thumb Abduction Restriction: To stop the thumb from jamming backward on defense, apply an anchor around the wrist and wrap an elastic strip through the thumb web space in a figure-eight pattern (spica wrap), finishing back at the wrist anchor.
Equip your bag with specialized, high-adhesion tape for volleyball designed to hold firm through intense rallies and heavy sweat.
Optimizing Your Wrap by Position and Avoiding Critical Errors
Position-Specific Techniques: How to Tape Hands for Volleyball
Every role on the volleyball court places unique physiological stresses on your hands:
- Middle Blockers & Outside Hitters: Front-row attackers experience high-velocity collisions at the net. Hitters and blockers benefit most from rigid zinc oxide X-taping and nail caps across the index, middle, and ring fingers to brace against ball impact.
- Setters: Playmakers need delicate touch, tactile ball feel, and rapid wrist articulation. Setters should avoid thick, rigid taping across all fingers. Instead, apply thin elastic stretch tape in single spiral passes to stabilize joints without diminishing ball control.
- Liberos & Defensive Specialists: Digging 70 mph spikes off the floor puts thumbs and pinkies at high risk. Defensive specialists often rely on thumb spica wraps and pinky buddy taping to absorb floor collisions and hard-driven serves.
To learn more about joint mechanics, review these clinical principles of functional bandaging biomechanics developed by physical therapy specialists.
When to Stop Taping and Seek Medical Evaluation
Athletic tape provides functional support for mild strains, but it is not a cure for structural trauma. Over 57% of volleyball-related fractures occur in the fingers. Stop playing and consult an orthopedic physician immediately if you experience:
- Visible bone deformity, abnormal joint angles, or obvious displacement.
- Inability to flex or extend the finger even after swelling decreases.
- Severe, throbbing pain that worsens when the digit is touched.
- Persistent numbness, discoloration, or loss of feeling that remains after removing all tape.
Frequently Asked Questions About Volleyball Hand Taping
How tight should hand and finger tape be during a match?
Finger tape should feel snug and supportive, never constricting. Always perform a capillary refill test: press firmly on the exposed fingernail or pad until it turns white, then release. Normal pink color must return within two seconds. If your finger begins to throb, turns pale or blueish, or feels cold and tingly, remove and reapply the wrap with less tension immediately to avoid the tourniquet effect.
Does taping fingers improve grip and ball control in volleyball?
Yes. Quality athletic tape features a textured outer fabric that increases friction against smooth composite leather volleyballs. This added traction helps players manage damp, sweaty balls during intense games, giving passers, setters, and hitters cleaner contact and improved control.
Which fingers do volleyball players tape most frequently?
The index, middle, and ring fingers are the most commonly taped digits on the court. These three fingers absorb the direct impact of the ball during net blocks and overhand sets. The pinky finger is also frequently buddy-taped to the ring finger to protect it from catching on the net or bending awkwardly during floor dives.
Conclusion
Mastering proper hand taping protects your fingers from painful sprains, split calluses, and jamming injuries, keeping you aggressive and reliable on the court. Using the right tape with clean, step-by-step technique gives your hands the reinforcement they need to perform at their best.
At SHIELD Health & Fitness, our American-made athletic wraps and precision tapes are engineered with over 35 years of manufacturing expertise to support competitive athletes through every match. Ready to keep your hands protected this season? Explore our complete lineup of professional volleyball taping gear and play with total confidence.